Tuesday, December 18, 2012

A Tour of the Bones

Merry Christmas!  Welcome to the adventure of transforming our new house into our home sweet home.

After a tad bit of drama during the purchasing process, we are just beginning to take stock of everything on the 'To Do' list.  It's a long one, but we're so thankful to be starting with great bones!  The house is a California Split with a twist (meaning the master is on the main floor with the kitchen) and has some major spacious living areas, a blank canvas for landscaping, an enormous garage, plus a bathroom for everybody.  Okay, I don't know if that last one is actually a plus...I keep looking for the house cleaning fairy that was supposed to come with the deal.

Since I started ripping down wallpaper yesterday, I thought I'd better get going on a journal of our progress, so let's start with a tour!

From the outside we're diggin' the three car garage, since our current two-car garage exists as a one-car/tons of tools and bicycles storage unit.  We may BOTH be able to park under cover...novel.

The New Project


Walking through the beveled glass front door trimmed in lavender, you see a huge entry fixture (sorry, took that photo out).  It needs to be to balance the size of the living area.  This is the main living room and it plus the entry make up about 400 square feet.

Living room...can you say "Cranberry"?
The shocking cranberry flat paint fairly well clashes with the yellow toned woodwork surrounding the purple-tiled fireplace and on the bannisters.  But I do think it looks worse in the photos than in person.  Thankfully.  The purple-ly tile also graces the entry half of this room.

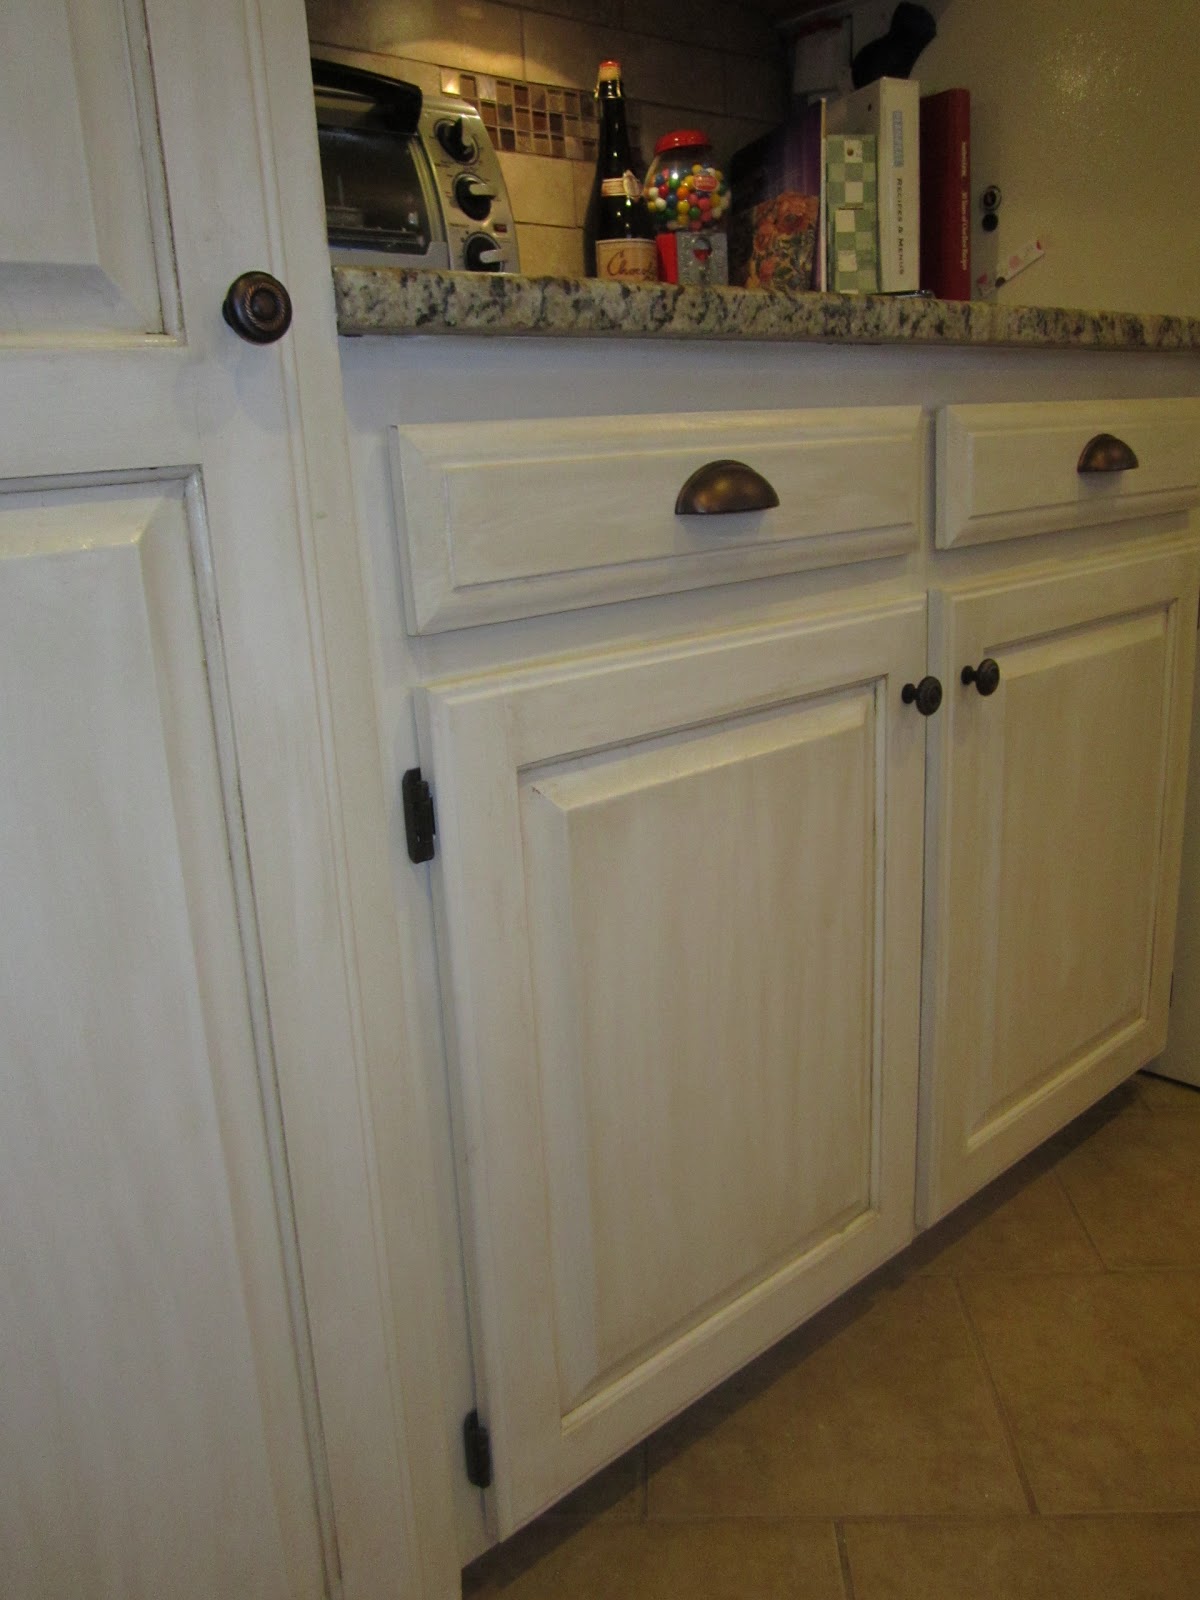
The kitchen is great...tons of cabinets and even a double oven (♥)!  And you KNOW I'm ready to start painting cabinets again!  Already have pulled the silver/white ceramic hardware off and the doors are next in line.
Ariel view of the Kitchen/Dining area
The laminate counter-top coordinates with the purple tile in the entry, so it will, ahem, be going.  However, we will keep the hardwood floors.  They are in good condition, just need refinished.

Just a few of the many shelves!
Down the hall from the kitchen is the master bedroom...no worries, can't miss it--it kind of glows a bit (in the dark?).  The double tray ceiling is nice and I'm excited to turn this suite into a peaceful & cozy space.

The light & bright Master Bedroom
Standing in the master closet, this is a peek of the master bathroom.  It's not the best angle, but I had to show you my very favoritest thing in the whole house.  See the vinyl just past the carpet?  Oh, yeah, baby, it's cushy.  Yup, cushy as in 'got some carpet under it'!  Bordered by a couple tacked down brass transition strips and gobs of caulk, we've got ourselves a comfy floor when stepping out of the shower!
The best spot in the house!
I do finally get a huge whirlpool tub, so I'm very excited about that!

Moving on to the top level of the house, we come to the kids' rooms.  They are smaller than the rooms in our current home, but have some nice details including the pretty Palladian window in Kai's bedroom.

Kai's room with the fantastic window.
The boys will share the hall bathroom with its double sinks and a separate tub and commode room.  

And then for our Elena-girl:  her very own suite!  Her pretty room is at the end of the hallway and includes a vaulted ceiling, walk-in closet and separate full bath.  She is beyond thrilled to have her own space and has designed a unique layout for all her furniture and some cool painting treatments for the walls.


Back down, and then down again and again, is the basement living area.  The doors you (barely) see on the right lead to 1.  The unfinished sub-basement and 2. An office, which we will use as a school room (YESSS!).  If you turn around you'll see a little hall with yet another full bathroom and a guest bedroom (#5).  Really all a lovely space that I know we'll use a ton!

Walk-out Basement
Finally, a peek at the back yard and deck.  It's sturdy and has a nice patio underneath and to the side.  There really is little to no landscaping so we're choosing to look at that as a plus since it means less to re-do.  Just starting from scratch!

The back deck
So there she is!  We have our work cut out for us, but as my dear sister reminded me, it's all cosmetic.  We are glad there are not walls that need knocked down or dilapidated cabinets to rip out etc. 

And now to the question lots of our friends and family have asked:   

Why in the world are you moving a couple miles down the road when you just finished re-doing your house?!!  

The answers:

#1 Community.  Great friends that we love and go to church with right next door and across the street.  Plus more friends and acquaintances scattered both around the double cul-de-sac and throughout the subdivision.  Kids EVERYWHERE.

#2  It was a good deal on a larger home--plus there is a community pool.

#3  What else to we have to do?  I mean really, there is lots of lounging on the couch going on around here, right?

Stay tuned.....


Sunday, September 02, 2012

Double Back Pony Tutorial

Yes, another hair tutorial...they are just so much fun!  This style is very feminine and can look a little vintage or retro if you tweak it a bit.  I wore the second variation shown in the video--more of a double back bun--to the pool all summer and it was great in and out of the water.  For me, a size large flexi clip works great, so try it with whatever size you usually use for a full twist...usually a size or two larger than what you need for a ponytail.

Let me know if you have questions, and enjoy making the world a prettier place with your Lilla Rose hair jewelry!


Friday, August 31, 2012

New French Twist Tutorial

After a visit to my favorite hair stylist, my locks are now shoulder-length and I have a nice shock of bangs.  This has changed-up my styling routine and I finally have mastered the French twist again.    I'm still using a size large flexi clip to secure it...the size you need will depend on the thickness and length of your hair.  Thanks for watching!


Make the world a prettier place by wearing your flexi clips from Lilla Rose!

Saturday, July 28, 2012

Are you gelish?

Gelish not of my man-hands (thanks, Dad), but of my day 5 DIY gel manicure?  Yes!  Happy early birthday to me!  One of the things my Grandma Ruth always said was "Keep your nails looking nice, girls!".  Ugh!  Any woman without mucho domestic assistance--we're talking maid, cook & laundry wench--knows the impracticality of a nice manicure on natural nails lasting more than 1 day.

So for the last year or so, whenever the time came for me to be a lady of leisure...aka vacation...I went to the salon and plunked down some change for a gel mani.  Since that practice is also not practical for everyday-life, I was excited when my friend told me about the DIY kits.  I saved up some fun money and treated myself last week with a trip to Sally's sans kiddos.

The only option they had was the Gelish Basix Kit, so that made my decision easy.  I also purchased the mini UV light and one color:  Exhale.  The color is significantly lighter/more neutral than it looks below, and I'm very pleased with it.  Looks like there are several other colors available online that my Sally's didn't have in stock.  They run about $13/bottle, so if you just happen to want to buy me something...


On Monday, after using my sister as a guinea pig, I stayed up another hour to do my own and then fell into bed around midnight.  Yes, you can go to bed as soon as it's done and not worry about hair and sheet imprints in your polish...I used to try to sleep with my hands gently folded hanging them over the side of the bed...not practical and didn't work either!  Anyway, my quest for consistently lovely nails is over for now.  I guess we'll chalk that up to one more thing technology has helped check off my bucket list!  And I hereby give you permission to give me much grief if you see me with bad nails.

Tuesday, July 24, 2012

Easy Hairstick Bun Tutorial

Get that hair up girls--it's too hot outside for long locks down our backs!  Here's an easy hairstick bun tutorial for ya.  It will hold with just a single pencil or chopstick if that's all you have.  Of course, it will look even more beautimus if you try it with a set of Lilla Rose beaded hairsticks, so go to my website to get some :) .


Wednesday, July 18, 2012

Asian Bun with Hairsticks Tutorial

Another fun bun, hun!  Enjoy!

Asian Bun with Hairsticks (shown w/Lilla Rose Freestyle sticks)


--By the way, no making fun of my Agent P t-shirt ;) ! 

There are all kinds of pretty hairsticks available on my Lilla Rose website.  Made of birch wood, they are available in black and blonde pairs and start at $12 a set.
   
Antiqued Copper w/Etched Petals; Silver Summer Sunflower; Soft Pink & Rose
Have a beautiful day and stop by my facebook page to become a flexi fan!

Sunday, July 08, 2012

Itsy, Bitsy, Teeny, Weeny...

PART 2 (Part 1 is here):

I never got the yellow, polka-dot bikini...mine was lime green with black polka-dots and I wore it the summer I turned 14.  With ruffles on top (to enhance, my, ahem...blossoming bosom), and a detachable strap, my bikini was my favorite outfit that summer.  I still have a picture of myself sporting it and perhaps the darkest tan of my life.  And my stomach turns now at the torment possibly brought on to my then friends that were boys as I baked in the sun along side my girlfriends at the pool.

FACT:  God gave all of us bodies designed to be beautiful to the opposite sex.

FACT:  If you do not cover your skin, people can see it.

FACT:  Most swimwear is not modest.

FACT:  If you live where it's HOT, swimming is a popular activity.

So what is a woman to do?  I've been taking mental notes at the public pool we go to and have observed that the answer to that question varies greatly from person to person.   

My intent is not to judge your decision, but is instead to spur conversation and thoughtfulness about what kind of swimwear is appropriate on an individual basis.

Have you thought about it?  If you are married, have you asked your husband what he thinks about what kind of swimwear you wear? 

For me, I have thought about it a lot...and here is what I have decided.  

If I am in public...meaning just about anywhere besides the privacy of a backyard pool with my husband being the only man present, I will wear a full-coverage one piece suit, preferably some kind of swim dress or shorts (this one is from JCPenney).  

One of my suits (not me)
If I am with Eric alone (thinking a romantic get-away to a private beach--hey, a girl can dream & I sure know it can happen--ahh, Italy & our private balcony)...then a bikini would be fine.  

I've simply decided that I don't want anyone seeing more of my body than is necessary.  I also do not want to flaunt my skin in front of other men, giving them the opportunity to fall into an unnecessary struggle to NOT look, NOT lust.  (NOT that I'm "all that"...it just doesn't take a super-model to make a man look...practically ALL women hold the power to intoxicate with our bodies--quickly.)

If you "don't care" what other people think...why not? 

If you don't think it's a struggle for men, try asking a few like your husband, brother or close friends.  Your husband may say "Oh, yeah, baby!  Bring on your bikini!"  But ask if he cares if you wear it to a reunion party with old college friends-without him around-and see if his answer remains the same.

If I had to state my main reasoning in one sentence it would be this:  As a Christian woman, I think I should do everything in my power to keep my brothers-in-Christ and other men from conflict.

As a random pool-goer, I really don't want to see other people in less than their underwear--men OR women.  So even if most everyone at the pool is a mom...wouldn't we be more comfy talking to each other without comparing stretch marks?  Oh...and don't forget the life guards...those young boys aren't immune to middle-aged women baring much skin.

Do you have a daughter?  Have you talked to her about modesty in clothing and swimwear?  Does what you say to her line up with what you model?

I often wear sundresses with spaghetti straps and low-cut fronts.  Hmmm...but I have a nine-year old whom I've been telling to make sure her tops don't come lower than a hand-width down from her collarbone.  I need to work on that, though I do feel that age makes a difference for that specific issue.

Wow, that's a lot of questions and a lot to think about.  Now you know what I've been mulling around in my brain during my hours of sleepless nights lately (dang chiggers).  Sure wasn't a bunch of organized thoughts, but, once again, it can't hurt to think about things like this...everything matters, you know! 

Braided Bun Trio

I sat at the girls' table today while out to lunch with a bunch of friends from church.  Our conversation starter?  Why, HAIR, of course!  My friend Kristin remarked that she should have known my style for the day was video-worthy *smile*.   And, wha-la, it was...made this in the early-morning hours before my kiddos were up and romping around.  After yesterday's record-breaking high temperatures (107 at my house), I had to get my locks up and off my neck!  Hope you enjoy it!

Braided Bun Trio w/bobby pin accents


Have a beautiful day!

Monday, July 02, 2012

One Flexi, Six Styles & Six Flexis, Six Styles

Can you say that title 5 times fast

Two new videos for you flexi fans this week.  Plus--the new July flexi-of-the-month just came out...a Summer Fun Flip Flop that is way beyond cute!


The first video demos the "flexibility" of one size of flexi--I use a medium to do six different styles.


The second shows six of our seven available sizes and a different style for each.

Six Flexis, Six Styles


Make the world a prettier place and wear your Lilla Rose flexi!

www.lillarose.biz/ResaRuth
www.facebook.com/LillaRose.ResaRuth

Sunday, June 17, 2012

Time for the Pool! What to bare?


Swimwear.  What do I bare?  I like to use common sense about things, but a middle-of-the-road conclusion from this topic has consistently alluded me.  I tend to get lost in the deep end really quick.  My new summer hobby of hanging out at the pool with my kiddos has given me a renewed desire to understand my own choices when it comes to covering up—or not. 
For this series, Part 1 will be me rambling on about some situations and thoughts.  Part 2 will look at specific facts and questions to consider.  We’ll see if there is a Part 3…maybe I’ll get enough feedback or figure out some answers before then.
I wore a bikini at the beach in Florida this year with my family.  My husband and family were the only people around that I knew and I didn’t really think about much except that I was getting a lovely winter tan—though it turned out to be a nasty, painful, sunburn instead. Dang!
I also wore the same bikini to lounge around the luxurious hotel pool in Italy.  There were three other people at the pool.  First, there was the Italian masseuse/pool boy who had already seen me in much less than a skimpy two-piece during my massage (yikes…that’s another story).  Second was my new English girlfriend who was nursing a hangover.  Third was a husband of one Eric’s (my dh) co-workers attending the same conference. 
#3 posed my problem.  I chit-chatted a tad about their continuing European vacation plans while basking in the sun, but I felt the desire to cover up with a towel.  Hmmmm.  He was completely benign in his conversation, speaking to me as a respected acquaintance, but seriously, I was basically in my underwear!  How can I expect any man to not at least take mental note of my lack of clothing.  Images are powerful!
Obviously, the ball is in my court, and the issue isn’t so much what I wear, but how I think and what I perceive others around me are thinking.  I chose to feel uncomfortable that a man, other than my husband, was observing most of my unclad body.  Had I been wearing my one-piece, I don't think there would have been an issue.
To prevent that situation from reoccurring, I have to change.  My clothes.  I don’t think I need to change my mind.  I want to save the intoxicating power of my bare mid-drift for one pair of eyes only.  I want only one man to be thinking of my curves or lack-thereof. 
If I were to instead just change my thinking and not be concerned when another man sees me in a bikini, would it be socially responsible from a Christian point of view? 
Do I want my husband to see my friends or just other women in general sporting bikinis at the family-friendly public pool?  What do they think when my husband makes conversation with them?
What do I think when I see a woman running around the neighborhood in 2” inseam running shorts and a sports bra?
What do you think about all this?  Does it need to be thought about?  
I'm on the wagon that says everything matters.  So I guess I'm going to think about it.

Thursday, June 07, 2012

Flexi Help: How to make your ponytail stay tight!

Tip #2:  Wrap it with a ponytail elastic!
Got a flexi floating around your drawer of hair things because it won't stay put? Try these tricks to help your ponytail stay tight.


Friday, May 25, 2012

'Do of the Day #7: Easy Braided Bun with a Flexi Clip

Ever have a day when you just don't want to fix your hair to wear it down? Ha! We all have them! Try this easy basic braid folded into a chic low bun to make those days a breeze.


And I'm having a special on my website until the end of this month:

Buy 3 items (Flexi clips, Headbands or You-Pins) and receive 1 FREE (up to $16, please). Purchases must be made online by 10 p.m. CST on May 31, 2012. You must email me at flexisrock@gmail.com with your order number and free selection. Free item will be processed after the promotional period ends and sent separately from your initial order. This promotion is only good through Resa Eastwood, Independent Consultant and is not sponsored by Lilla Rose, Inc.

Thursday, May 24, 2012

'Do of the Day #6: Braid with Side Bun

A side bun instantly adds a little elegance to your style...especially if it's a bun that won't fall out every half hour.  (Yeah, you other gals with long thick hair know what I'm talking about!)  Try this look with or without the Dutch braid and held with a pair of Lilla Rose You-Pins.  Be sure to sign up for my newsletter as I have a new special coming soon!


Tuesday, May 22, 2012

'Do of the Day #5: Tails Up Twist for Long Hair

The Tails-Up Twist is a super popular hairstyle for women of all ages. Most of us have worn this look with the ubiquitous claw clip making it a practical, but somewhat uncomfortable and unsecure--don't EVEN think of putting your head back on a chair or headrest of a car with a claw holding it up--OUCH!

Add to all that the fact that longer than shoulder length locks gives you more of a floppy rooster tail than a cute little fluff at the top! I've been determined to figure something out so I can wear this style again...wah-lah! Using a Lilla Rose flexi clip to hold it up, I can tuck the longer ends into the twist on either side and they stay put--comfortably--all day! Perfect!


I wanted to make it fancy for a girls' day out with my sister, so I braided a bit of hair above my ear and wrapped it around like a headband.  It is secured with a couple bobby pins just behind the opposite ear.
As a final touch, I swept my long-ish bangs over to the side (again used a couple bobbies) and sprayed it all with flexible hairspray.

Monday, May 21, 2012

'Do of the Day #4: French Twist & Headband

Today's 'do is a first time experiment. I really love the Lilla Rose beaded headbands, however the wonderful adjustable elastic band needs a place to hide when doing an updo like this French Twist!  See what you think:

French Twist with a Flexi and a Freestyle Headband for accent.  (Had to leave in the little guy making a funny face too!)

Friday, May 18, 2012

'Do of the Day #3: Ballerina Bun with You-Pins

My favorite hairstyle when I was a little girl is now back in style! A classic topknot or ballerina bun is perfect for everyday or a special occasion. The best thing about using the You-Pins to hold it up? NO BOBBY PINS REQUIRED! Nope, not a single one (though I could use a little hairspray for my fly-aways).

These beauties are You-Pins!  This design is called "Etched Daisies".  They are available for $15/pair on my Lilla Rose website.

Kitchen Before & After

Our kitchen remodel was started in December 2010. It began with moving the laundry room upstairs and has progressed through modifying the layout by ripping out a couple walls, adding a couple cabinets and replacing or resurfacing, well, almost everything. Most of the work was done in spurts during time Eric took off from work, to, um, work more! I will use the word "we" in a lot of the comments, but please know that my man did most everything himself--sometimes I wonder if it wasn't because he was afraid I would just mess it up. 

Before:  Cooking/Cleaning area all original to the house built in 1991 (except the counter microwave that we needed since the built-in died a few years back--made a great, oversized timer!)
Before:  Food storage area, pantry w/pull-out drawers in cabinet on left, the "pile" counter, fridge.
Before:  Dining area looking into the living room.
During:  Wall between the kitchen & living room ripped out (July '11).  Before view of the sliding glass doors and "extra" back door (that half window to the left of the sliders).
After:  Cooking area with a peek at the bar & window that replaced the sliders.

After:  New bar (now has stools & valance over the window) & broom cabinet.

After:  Close up of backsplash (tile from Heartland Tile & Stone in Raymore, MO) -♥ the mosaic details- & granite (St. Cecilia) inspired by the designer show house I toured in Topeka, KS last spring. 

After:  Close up of our painted & glazed cabinets.  I did all of the cabinet resurfacing using Rustoleum's Cabinet Transformations light kit in Linen.  Hardware in Antique Bronze from Locks & Pulls in Overland Park, Kansas.

After:  View standing by the previously unused backdoor looking into the kitchen.
So there's the nickle tour!  The "After" pictures were taken on Christmas Day 2011, so we've had some time now to live in the space and it's truly been enjoyed by our whole family.  Hope you like what we've done--it was a lot of work and we're still wrapping up the redo of the room that was the original laundry area (through that door to the right of the stove--there is a 1/2 bath and then the room).  It's transforming into a walk-in pantry/utility room full of shelves and purposeful storage---yay!

Thursday, May 17, 2012

'Do of the Day #2: Half-Up Twist

Our 'Do of the Day is a twist on a half-up: The Half-Up Twist!


Take this classic hairstyle up a notch by wearing a Lilla Rose flexi instead of a plastic claw or barrette.   
**Shown above: Small Petite Dragonfly  Shown in video: Medium Celtic Cross**

If your flexi is sized to wear all your hair up in a French twist etc., it's probably too big to pull back only the top section of your hair.  However, twisting it into this style allows you to gain more versatility with that larger clip--brilliant! 


Thumbs up to my lovely assistant, Elena. She has become quite the producer making sure to start and stop recording and shushing her brothers while we are filming.  I'm working on featuring her with some of our 'dos---we'll see!

Wednesday, May 16, 2012

Florida with our bunch!

Florida Vacation Snapshots...finally! Enjoy this tour of highlights from our vacation in Treasure Island, Orlando & Brooksville (Tampa area) taken during our week stay the end of February 2012.

(And a "YAY! & Thank you!" goes out to Blogger for making multiple photo uploads a breeze--this took me 2 minutes vs. 20+ minutes doing it in the old version!)